
FAQ / SUPPORT
-
APW-200
-
Cash Drawer
-
CAS LP-1000
-
DLP-300
-
DSW-100
-
GL-6000L
-
HK-7200
-
MVW1
-
MVS1
-
OKPOS
-
TBW/TBWS
-
TPD
-
TVC
-
TVD-D
-
TVP
-
TVS
-
TXDi
-
VK Kitchen Scale
-
VKC-3
-
VTH-500
-
Others
-
Warranty / Tech Support
-
Shipping and Returns
Please watch the video: https://www.youtube.com/watch?v=WYSNOeac9qQ
Please watch the video: https://www.youtube.com/watch?v=m6agRCYzUzA
Please watch the video: https://www.youtube.com/watch?v=uEpkYBLzhpU&feature=emb_title
Please watch the video: https://www.youtube.com/watch?v=9WbdyXoNVBE&t=8s
Please watch the video: https://www.youtube.com/watch?v=cUL5MI71rnM;t=8s
The main mechanism used to open the drawer is a lever that can be controlled with both the back switch and the key. The most common reason this mechanism fails for the key is because the lever in the back is bent. To troubleshoot, first remove the drawer from the cash register and turn it upside down. If you use the key, you will notice that a lever that sticks out the back moves. With the drawer upside down, bend the portion of the lever that sticks out downward (towards the top of the drawer). Also make sure that it is perpendicular to the edge of the drawer. After manipulation, place the drawer back into the register and the key should be functioning.
Please watch the video: https://youtu.be/hC-HarLmaWQ
Please watch the video about print head of CAS LP1000: https://www.youtube.com/watch?v=SWe_oLqrhpM
1. First turn off the scale
2. Open the front cover and remove the two bolts as shown in the picture on the left-hand corner using a screwdriver
3. Open the side door and turn the print head lever up
4. Dismantle the TPH
5. Sometimes, the pins on the PCB touch the metal bar, therefore, to ensure safety please cover all pins with electrical tape
6. Take a new TPH and connect it, but ensure you do not get hurt as shown in the picture
7. Turn the print head lever by pushing down
8. Reassemble the bolts as shown
9. Turn the print head and adjust the label paper guide to fix the label back into the right position
10. Close the side door and the front cover
11. Test the change by printing
12. To print press “2”, [MODE], and press [▼] key twice. Then you will see “CHESS” on the information display.
13. Press [PRINT] key twice.
Please see the video about label feed adjustment: https://youtu.be/LeaeuKRDc8s

Please see the video about changing label formats: https://youtu.be/YRKYjNbsNPo

Please see the video about create speed keys: https://www.youtube.com/watch?v=bBWtr2nwP3Y
Please see the video about show/side PLU menu categories: https://www.youtube.com/watch?v=uYuwN9Sfj5A

Please see the video about install XDB Manager: https://www.youtube.com/watch?v=BOcscK6ADII
1. Go to DLP-300 product page on Visiontechshop.com
2. Click on Download tab under product image.
3. Click on "XDB Manager Software" link.
4. Download link is also provided in description to our youtube video.
5. Extract downloaded file to directory of your choice.
6. Right click "XDBManager" file.
7. Select "Create shortcut" on menu.
8. Cut & Paste shortcut to desktop.
9. Click on "More info" on windows warning.
10. Click "Run anyway"
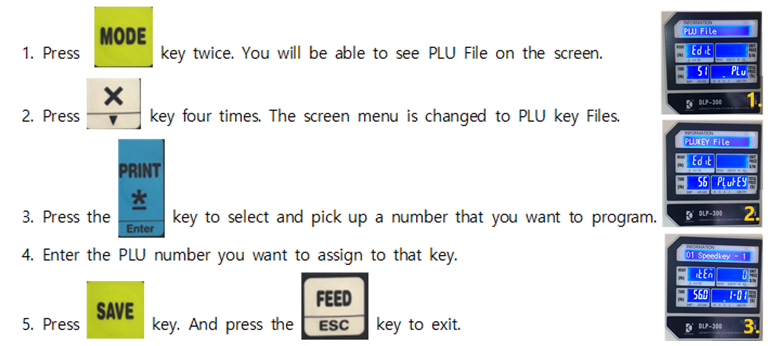
Please see the video about create a New PLU Code: https://www.youtube.com/watch?v=_Gizpf0o04c
1. Press "MODE" key twice and "PRINT" key one time.
2. Enter the PLU number you wish to create and press the "PRINT" key.
3. Enter the PLU name (ex. RIB EYE) and press "PRINT" key.
4. Enter the unit price and press the "PRINT" key.
5. Enter the PLU Type and press the "PRINT" key.
* No. 0 (Weight) | No. 1 (Non-weight) | No. 2 (By count)
6. Enter the Item code and press the "PRINT" key.
7. Enter the sell by date and press "PRINT" key.
8. Enter the sell by time and press "PRINT" key.
9. Enter the tare weight (if you want) and press "PRINT" key.
10. Enter the qty and press the "PRINT" key.
11. Enter the Ingredient message and press the "PRINT" key.
** Number 0 means not to print | Number 1 means to print
12. Enter the print sell by date status (0: No, do not print | 1: Yes print) and press "PRINT" key.
13. Enter the print sell by time status (0: No, do not print | 1: Yes print) and press "PRINT" key.
14. Enter the print cook by time status (0: No, do not print | 1: Yes print) and press "PRINT" key.
15. Enter the print pack date status (0: No, do not print | 1: Yes print) and press "PRINT" key.
And enter the discount status(0 or 1) and press the "PRINT" key.
If you get back to PLU NO section, you are done to make a PLU code.
Press "FEED" key twice to see if you make a code well.
Enter the PLU number you just created and press "PLU" key. And press "PRINT" key.
Please see the video about enter the store information: https://www.youtube.com/watch?v=jko0BeXwB4U
1. Press "MODE" key twice and press "X" key.
2. Press "PRINT" key and enter shop number. And press "PRINT" key.
3. Enter the first line of shop information. Which is store name.
You can clear the existing information by pressing the "C" key.
4. Type your store name.
5. Press "X" key to go to the next line.
Enter the second line information. It can be either phone numbers or address.
If you want to add more information, you can press "X" key to add more lines.
6. To finish, press the "PRINT" key and then "SAVE" key.
Please see the video about wirelessly connect the scale with XDB Manager: https://www.youtube.com/watch?v=PNNzhwGWfWI
Setting up a WIFI network on the DLP-300 scale.
1. Press and hold the [ZERO] key and press “1”+”1”+”2”
2. Press the [PRINT] key, press “1” and press the [PRINT] Key.
3. Press [x] key 9 times. You will see “H11” on the TARE display and “WIFI IP” on the INFORMATION display.
4. Press the [PRINT] key then press “192”. Press [PRINT] then “168”. Press [PRINT] then “43”. Press [PRINT] then “21” then [PRINT]. (This is the number you set as your Scale IP address on the computer from the previous section)
5. Press the [PRINT] key 5 times. You will see “H13” on the TARE display and “WIFI Gateway” on the INFORMATION display.
6. Press the [PRINT] key then press “192”. Press [PRINT] then “168”. Press [PRINT] then “43”. Press [PRINT] then “1” then [PRINT]. (This number is only for our network. You might have a different #).
7. Press the [PRINT] key then press “192”. Press [PRINT] then “168”. Press [PRINT] then “43”. Press [PRINT] then “1” then [PRINT]. (This number is only for our network. You might have a different #).
8. Now, you will see “H15” on the TARE display and “SSID” on the INFORMATION display.
9. Press the [BROWSE] key. Press the [OVER RIDE] key until you find your WIFI SSID then press the [PRINT] key.
10. Press the [PRINT] key 3 times.
11. Enter the WIFI password and press the [PRINT] key.
12. Press the [PRINT] key 2 times and press [SAVE].
Connecting the DLP-300 scale with XDB manager software
1. First of all, if you want to find your PC IP address and DNS Servers IP address, go to “Internet Access” - "Properties". You will see your PC IP address, DNS Servers IP address, WIFI SSID, and etc.
2. Open XDB Manager software.
3. In section [Dept-Mg-Scale], right click and select [Add DEPT].
4. Fill out the Dept No. and Dept name. And press [Save] and [Close].
5. Right click on the Department. And select [Add MainGroup]
6. Fill out [MG NO.] and [MainGroup Name]. Select the Department. And press [Save] and [Close].
7. Click the Department. "DB MART" and right click on "Vegetable"and select [Add Scale].
8. Fill out [ScaleNo], [IP Address] for scale IP address. We put 192.168.43.21 for scale IP address. And press the [Save] and [Close].
9. Search “CMD”(or “Command Prompt”) on your PC to run Command Prompt. Enter “ping 192.168.43.21” which is your DLP-300 scale IP address. And press ENTER. If you get a reply, then your DLP-300 scale is connected correctly to your WIFI network.
10. You just finished adding a scale to the XDB manager software. Now, I will show you how to add a PLU to the XDB manager. Enter the PLU #, Item Code, Name, Unit Price, and press the [SAVE] key. You can add some Ingredients as well.
11. Let’s try to download PLU data for testing. Click “TCP/IP” on the top menu bar of the XDB manager.
12. Click “Download All PLU” and click the scale #. Then click [OK].
13. Once you see the 100% green bar in the Progress Bar, the PLU data has properly downloaded. You will be able to call PLU data from your scale.
Please see the video connect directly a DLP-300 to XDB Manager with RJ45 Cable: https://www.youtube.com/watch?v=qvktR98osB0
How to connect directly a DLP-300 to XDB Manager with RJ45 Cable.
There are two ways to connect your DLP-300 scale with XDB manager by wired network.
1. DLP-300 directly connect to XDB manger
2. DLP-300 connect to XDB manger via your network.
I will explain how to connect (1) DLP-300 directly connect to XDB manger on this video.
1. Plug a RJ45 cable (: Ethernet cable) from PC to DLP-300 directly.
2. Set up or see your PC IP address. Go to Network – Change adapter options.
And go to the properties. Click TCP/IPv4 – Properties. Then you can see your PC IP address.
(Our is 192.168.1.50)
3. Press and hold the [ZERO] key and press “1” +”1” +”2. If you want to set the scale # as #1, then
4. Press the [PRINT] Key, press “1” and press the [PRINT] Key.
5. Press [x] key. You will see “H03” on the TARE display and “Ethernet IP” on the INFORMATION display.
6. Press the [PRINT] key then press “192”. Press [PRINT] then “168”. Press [PRINT] then “1”. Press [PRINT] then “51” then [PRINT]. (This is the number you want to set as your Scale IP address)
7. Press [SAVE] key.
Connecting the DLP-300 scale with XDB manager software.
1. Open XDB Manager software.
2. In section [Dept-Mg-Scale], right click and select [Add DEPT].
3. Fill out the Dept No. and Dept name. And press [Save] and [Close].
4. Right click on the Department. And select [Add MainGroup]
5. Fill out [MG NO.] and [MainGroup Name]. Select the Department. And press [Save] and [Close].
6. Click the Department. "DB MART" and right click on "MEAT" and select [Add Scale].
7. Fill out [ScaleNo], [IP Address] for scale IP address. We put 192.168.1.51 for scale IP address. And press the [Save] and [Close].
8. Search “CMD”(or “Command Prompt”) on your PC to run Command Prompt. Enter “ping 192.168.1.51” which is your DLP-300 scale IP address. And press ENTER. If you get a reply, then your DLP-300 scale is connected correctly to your PC
9. You just finished adding a scale to the XDB manager software. Now, I will show you how to add a PLU to the XDB manager. Enter the PLU #, Item Code, Name, Unit Price, and press the [SAVE] key. You can add some Ingredients as well.
10. Let’s try to download PLU data for testing. Click “TCP/IP” on the top menu bar of the XDB manager.
11. Click “Download All PLU” and click the scale #. Then click [OK].
12. Once you see the 100% green bar in the Progress Bar, the PLU data has properly downloaded. You will be able to call PLU data from your scale.
Now, I will show you how to download store name to the DLP-300 from XDB Manager.
1. Click Config on top mane and click Shop TextConfig.
2. Click ShopName01 and put store information on Content.
We put our company information “DB MART 201.123.4567” “100 TEMPLE AVE, HACKENSACK, NJ 07601”
And Click Download.
3. Click scale # - ok. Once you see the 100% green bar in the Progress Bar, the store name has properly downloaded.
4. Click [Apply] and [SAVE]
Please see the video about print labels with backing paper on: https://www.youtube.com/watch?v=60lAvdDDUew
1. Please take out the cartridge from the scale and cut the label nicely. And please put the cartridge back.
2. You will see the message “Press Feed key” or “Please Remove La”. This is fine. Go to the next step as is.
There are two ways to set up printing labels with backing paper.
The first way is the following :
1. Press the [ZERO] key and press “1”-”4”-”1”
2. Press “5”-“3” then the [X] key. You will see “Enable ROM” on the INFORMATION display.
3. Press “0” which will disable the peel off sensor. And press [PRINT] then [SAVE].
4. Press the [FEED] key and call a PLU. Let’s call PLU #2 and print 5 labels.
Then, press “2” - [PLU] - [Pre Set Count] - “5” - [PRINT] – [FEED].
The second way is the following :
1. Press the [ZERO] key and press “1”-”1”-”3”
2. Press the [X] key 4 times. You will see “P05” on the TARE display and “Enable ROM” on the INFORMATION display.
3. Press [PRINT] and press “0” which will disable the peel off sensor. And press [PRINT].
4. You will see “P06” on the TARE display and press [SAVE].
5. Press the [FEED] key and call a PLU. Let’s call PLU #2 and print 5 labels.
Then, press “2” - [PLU] - [Pre Set Count] - “5” - [PRINT] – [FEED].
Please watch the video: https://www.youtube.com/watch?v=kSn2Um_PLlo
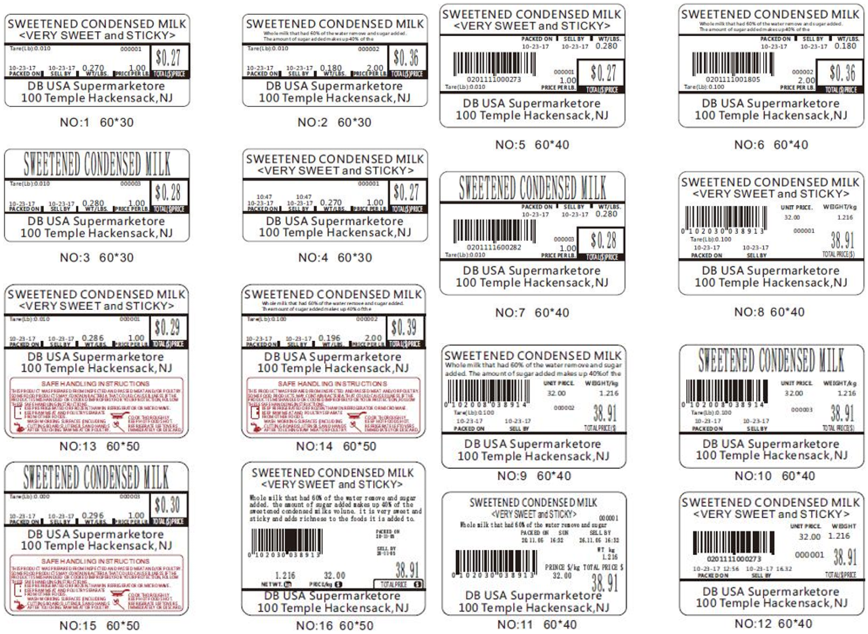
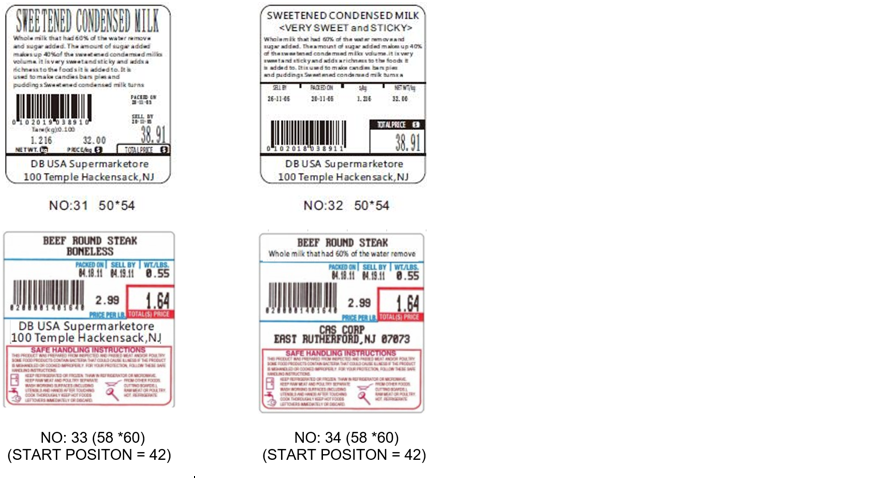
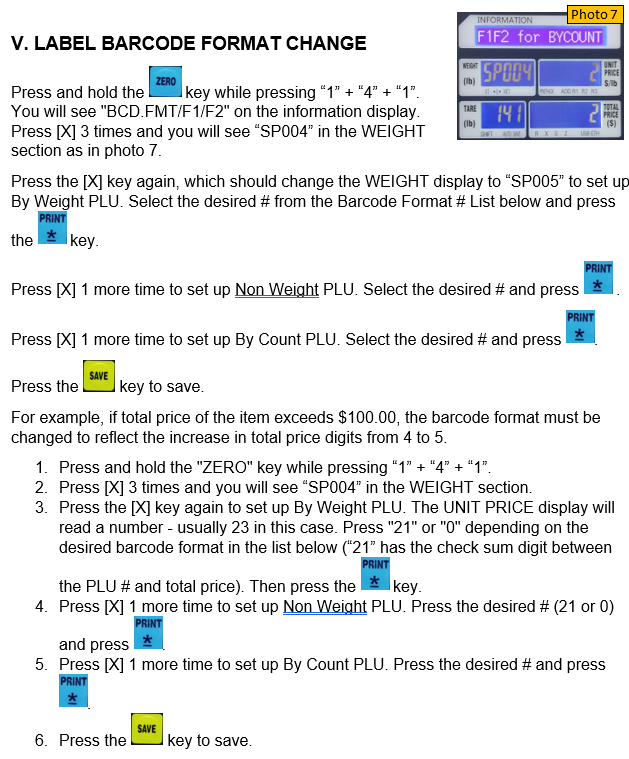
The main issue here is usually that the total price of the item exceeds $100.00 and the barcode format must be changed to reflect the increase in price digits from 4 to 5. Please follow the instructions below:
Press and hold the "ZERO" key while pressing “1” + “4” + “1”. You will see "BCD.FMT/F1/F2" on the information display.
Press [X] 3 times and you will see “SP004” in the WEIGHT section.
Press the [X] key again, which should change the WEIGHT display to "SP005", to set up By Weight PLU's barcode. The UNIT PRICE display will read a number - usually 23 in this case. Press "21" or "0" depending on the desired barcode format in the list below (“21” has the check sum digit between the PLU # and total price). Then press the "PRINT * ENTER" key.
To set up Non Weight PLU's barcode, press the desired # ("21" or "0") and press "ENTER".
To set up By Count PLU's barcode, press the desired # and press "ENTER".
Press the "SAVE" key to save.
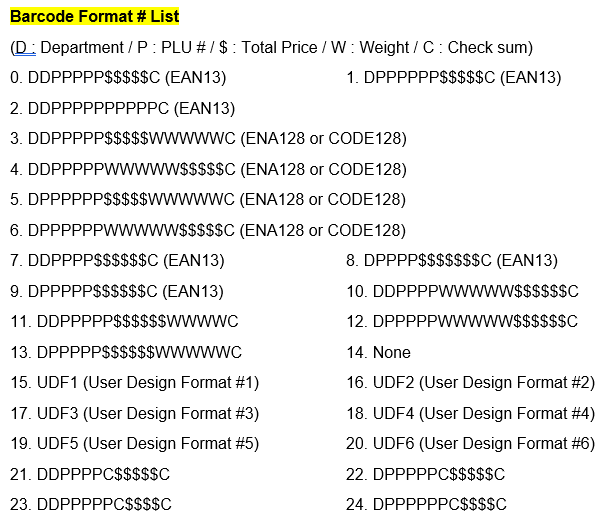
Barcode Format # List (D : Department / P : PLU # / $ : Total Price / W : Weight / C : Check sum)
0. DDPPPPP$$$$$C (EAN13)
21. DDPPPPC$$$$$C
23. DDPPPPPC$$$$C
Please watch the video for "Amount Overflow" error: https://www.youtube.com/watch?v=kSn2Um_PLlo
The main issue here is usually that the total price of the item exceeds $100.00 and the barcode format must be changed to reflect the increase in price digits from 4 to 5. Please follow the instructions below:
Press and hold the "ZERO" key while pressing “1” + “4” + “1”. You will see "BCD.FMT/F1/F2" on the information display.
Press [X] 3 times and you will see “SP004” in the WEIGHT section.
Press the [X] key again, which should change the WEIGHT display to "SP005", to set up By Weight PLU's barcode. The UNIT PRICE display will read a number - usually 23 in this case. Press "21" or "0" depending on the desired barcode format in the list below (“21” has the check sum digit between the PLU # and total price). Then press the "PRINT * ENTER" key.
To set up Non Weight PLU's barcode, press the desired # ("21" or "0") and press "ENTER".
To set up By Count PLU's barcode, press the desired # and press "ENTER".
Press the "SAVE" key to save.
Barcode Format # List (D : Department / P : PLU # / $ : Total Price / W : Weight / C : Check sum)
0. DDPPPPP$$$$$C (EAN13)
21. DDPPPPC$$$$$C
23. DDPPPPPC$$$$C
Please see the video about change label rolls: https://www.youtube.com/watch?v=o7pNC-QRPLU
1. Open the side door.
2. Turn the print head lever clockwise and remove the cassette.
When pulling out the cassette, it helps to use both hands and apply a downward pressure while removing it.
3. Remove both the backing paper holder clip and label roll holder.
4. Take off 4 to 5 stickers and place roll of labels on the label roll spool.
5. Take the end of the label roll and place it between the black sensor plate then thread the paper over the front metal bars.
Please do not thread the label paper between the front bars.
Threading the label paper between the bars will produce an error.
6. Pull out enough paper to go over the white plastic roller and under and around the black backing paper spool.
Make sure not to slide the label roll under the white plastic roller.
Place the clip holder to secure the label backing paper.
7. Place the label roll holder on the label roll spool and rotate it 15 degrees clockwise.
8. Adjust the white label paper guide to fix the label into the right position.
9. Install the cassette with labels into the scale.
10. Turn the print head lever counterclockwise to lock it. Then close the side door.
11. Press the [FEED] key a few times so the scale can recognize the size of the label.
There is also a brief installation guide on the side door that you can use as a reference
If you get the label, you are all set.
There is also a brief installation guide on the side door.
Please see the video about change the department # of barcode: https://www.youtube.com/watch?v=gmw8RUERp2M
Press and hold [ZERO] key and press “1” + “4” + “1”. You can see "BCD.FMT/F1/F2" on the display.
Press [PRINT] key. Press “9” + “9”.
Press [PRINT] key and press [SAVE] key to save and exit.

Please see the video about change label barcode format: https://www.youtube.com/watch?v=kSn2Um_PLlo&t=3s
Press and hold [ZERO] key while pressing “1” + “4” + “1”. You can see "BCD.FMT/F1/F2" on the display.
Press [X] 3 times. You can see “SP004” in the WEIGHT section on the display.
Press the [X] key again, which should change the WEIGHT display to “SP005” to set up By Weight PLU.
Select the desired # from the Barcode Format # List below and press [PRINT] key.
Press [X] 1 more time to set up Non weigh PLU. Select type # and press [PRINT] key.
Press [X] 1 more time to set up By count PLU. Select type # and press [PRINT] key.
Press [SAVE] key to save.
Please watch the video about "Please Remove La" message: https://www.youtube.com/watch?v=Ga6cg_ElPwQ
The “Please Remove Label” message appears when the label size used does not match the label size that is set up in your DLP-300 or Label Peel Sensor value changed. In this case, the label size and/or sensor setting needs to be adjusted on the scale. Or if the label roll is installed incorrectly, then you can get the message “Please Remove La”. Please check your label to see if the label is installed correctly. Please do not thread the label paper between the front bars and/or make sure not to slide the label roll under the white plastic roller.
1. If your label roll is installed correctly, you need to check the printer sensor value.
2. Press and hold the [ZERO] key. At the same time, press “1” - “1” - “3”.
3. You will see "GAP Sensor Val" on the information display.
4. Press the [PRINT] key 2 times (you will see P02 on TARE display)
5. You should see “40” on P02 if set up correctly.
If you see “20” or any other number, you need to change it by pressing [PRINT] - "4" - "0" - [PRINT]-[SAVE]
6. Another issue could be that the Start Position is too high compared to your label size.
7. So please reduce the start position.
8. Press and hold the [ZERO] key. At the same time, press “1” - “1” - “3”.
9. You will see "GAP Sensor Val" on the information display.
10. Press the [X] key 2 times(for P03 on TARE display and “start Position” on the information.).
You can see the start position value which is 115 on UNIT PRICE display. Please reduce 40 from 115 which is 75.
11. Press [PRINT] - "7" - "5" - [PRINT] (for P03.1 on TARE display)
12. Press the [SAVE] key. Press the [FEED] key.
13. Call a PLU and print a label for test.
14. As you can see, we resolved the error message, "Please Remove La".
15. If you still have “Please Remove La” message, then we can try disabling the GAP sensor.
16. Press and hold the [ZERO] key. At the same time, press “1” - “1” - “3”.
17. You will see "GAP Sensor Val" on the information display.
18. Press the [X] key 4 times (for P05 on TARE display and “Enable RMO” on the information.)
19. Press [PRINT] – “0” – [PRINT] – [SAVE] – [FEED].
20. Call a PLU and print a label for test.
Please see the video: https://www.youtube.com/watch?v=hrygvENlxYA&t=33s
1. By weight. For example, if the desired unit price is $1.99 per LB
a. Place the item and press the [MISC WEIGHT] key.
b. Press 1 – 9 – 9 for the desired unit price
c. Press the [PRINT] key
2. By non-weight: If the desired unit price is $1.50 per piece and you want to sell 2 pcs.
a. Press the [MISC NON WEIGHT] key
b. Press 2 for the desired quantity
c. Press the [FOR] key and press 1 – 5 – 0 for the desired unit price
d. Press the [PRINT] key
3. By item count: If the set unit price is $5.00 per 2pcs but you need to sell 3pcs.
a. Press the [MISC BY COUNT] key
b. Press 3 for the desired total quantity.
c. Press the [FOR] key and press 2 for the set unit quantity.
d. Press the [FOR] key and press 5 – 0 – 0 for set unit price per 2 pcs
e. Press the [PRINT] key
Please watch the video: https://www.youtube.com/watch?v=pzpXsayQZxY
Today, I will show you how to add an image on the DLP-300 scale label using XDB Manager software.
First of all, your DLP-300 scale should be connected to XDB Manager software.
1. Open the XDB Manager.
2. Click [Config] and click [SPEC].
3. Find and click [LOGO] at the top.
4. Click [LOGO01] and click [Load].
5. Select the image that you want to add on the label. I will add the Safe handling instruction image on the label.
Please remember the file format of the image must be BMP and the size of image must be less than 10kBite.
6. Click download - select the scale # - then ok.
Once you see the 100% green bar in the Progress Bar, the image has properly downloaded.
7. Apply and save the Config window.
8. Open [LabelDesigner]
9. Open your label file or create new label for you.
10. "CLICK AND DRAG" LOGO1 from the left side menu.
11. Change values to the following.
X : 16 , Y : It's up to you.(272) , W : 439 , H : 158
12. Enter “1” as "LOGONO". This # is the logo # that you downloaded in your DLP-300 scale from steps #1~6.
13. Click Download the label format. Select the scale #. Click OK.
14. Once you see the 100% green bar in the Progress Bar, the label format has properly downloaded.
15. Test your changes by printing
Please watch the video for first user: https://www.youtube.com/watch?v=2-FaWmbJ1j8&t=6s
** Set up the store information **
1. Press the "MODE" key twice and press the “AUTO” key..
2. Press the "PRINT" key and enter the shop number. And press the "PRINT" key.
3. Enter the first line of your desired shop information, which can be your store name.
You can clear the existing information by pressing the "C" key.
4. Press the "X" key to go to the next line. Enter the desired information for the second line.
For example, you can add either your phone number or address.
If you want to add more information, you can press the "X" key to add more lines. But normally the label format is only for two lines.
5. Press the "PRINT" key and then the "SAVE" key
6. Press the “FEED” Key.
7. The store name will be printed on the label from “2nd Label”, not 1st label.
** Create PLU : By Weight / By Count **
1. Press the "MODE" key twice and the "PRINT" key once.
2. Enter the PLU number you wish to create or edit and press the "PRINT" key.
3. Enter the PLU name (ex. RIB EYE) and press the "PRINT" key.
4. Enter the desired unit price and press the "PRINT" key.
5. Enter the PLU Type and press the "PRINT" key. * No. 0 (Weight) | No. 1 (Non-weight) | No. 2 (By count)
6. Enter the item code and press the "PRINT" key.
7. Enter the sell by date and press the "PRINT" key.
8. Enter the tare weight (if you want) and press the "PRINT" key. We pressed “2” which indicates 0.02 LB
9. Enter the qty and press the "PRINT" key. In this case, we are creating a by Weight PLU so, we put “0” as the quantity.
10. Enter the Ingredient message and press the "PRINT" key.
11. You can choose to print the “SELL BY DATE” or not. Press 1 : Print or Press 0 : Not Print
12. You can choose to print the “PACKED ON DATE” or not. Press 1 : Print or Press 0 : Not Print
13. Press “SAVE”. It’s very important to press the SAVE key every time after creating a PLU.
14. Press the “FEED” key.
** Set up Speed key **
1. Press the MODE key twice.
2. Press the X key five times then press PRINT
3. Enter the PLU number you want to assign to the #1 key.
4. Print and you can enter the PLU number you want to assign to #2 key.
5. Press SAVE then FEED.
Please watch the video about set it up as KG: https://www.youtube.com/watch?v=bplm_C-ktMg
1. First turn on the DLP-300
2. Press and hold the [ZERO] key while pressing “1”+”0”+”1”+”3”.
3. Press and hold the [ZERO] key while pressing “1”+”4”+”2”.
4. Press “7”+”0”+”8” and press [X] key. And press “1” – [PRINT] key.
5. Press “7”+”3”+”5” and press [X] key. And press “0” – [PRINT] key.
6. Press “7”+”3”+”9” and press [X] key. And press “2” – [PRINT] key.
7. Press “7”+”4”+”1” and press [X] key. And press “3” – [PRINT] key.
8. Press [SAVE] key.
9. Then turn off the scale
10. Flip the scale and you will find the CAL switch cover on the bottom back side. Remove the CAL switch cover.
11. Turn on the scale and you will hear a BEEP sound.
Once you see “Booting....” on the information display, press and hold the CAL switch until you hear a short BEEP sound.
12. Wait until the screen displays all 000 and the time. Then press and hold [ZERO] key while pressing “9”+”8”+”1”+”1”.
13. Make sure that you can see “Demarcate” in the Information display. If you don’t see this, please go back through steps 1-12.
14. Press the [PRINT] key twice. You will see “SP” and “30.000” on the Total Price display.
15. Load a 30 kg weight then press the [PRINT] key.
16. The Weight Display should read 30.00. Remove the weight to make sure the weight goes down to 0.00.
Then place the weight back on to confirm that the scale is reading the weight properly.
Please watch the video: https://www.youtube.com/watch?v=NY-f_ivZLQI
[AUTO mode]
: Enable to print a label automatically for a By Weight PLU after placing a weight on the scale without having to press the “PRINT” key.
This does not work for the Non Weight PLU or By Count PLU.
1. Press the AUTO key. (The tri-mark(▼) above AUTO on the display filter should be illuminated.)
2. Recall a By Weight PLU and place an item on the platter.
3. The label comes out automatically.
4. To cancel the AUTO mode, press the AUTO key.
[SAVE mode ]
: Enable to remain PLU information after printing a label
1. Press the SAVE key. (The tri-mark(▼) above SAVE on the display filter should be illuminated.)
2. Recall a PLU. If it is a By Weight PLU, then place an item on the tray.
3. Press the PRINT key.
4. Even if you remove the item from the platter, the PLU information remains on the display.
5. To clear the PLU information press the blue C key.
6. To cancel the SAVE mode, press the SAVE key.
[PREPACK mode]
: Combination of AUTO and SAVE options. With the By Weight PLU, labels will print automatically once the weight is placed on the scale and stabilized, without pressing the “PRINT” key and when you print a label and remove the weight, the PLU information remains.
This option does not work for the Non Weight PLU and By Count PLU modes.
1. Press the PREPACK key. (The tri-mark(▼) above PREPACK on the display filter should be illuminated.)
2. Recall a By Weight PLU and place an item on the tray.
3. The label comes out automatically.
4. Even if you remove the item from the tray, the PLU information remains on the display.
5. You can put another item on the tray and the label comes out automatically.
6. To clear the PLU information, press the blue C key.
7. To cancel the PREPACK mode, press the PREPACK key.
Please watch the video about Temporary Price Change: https://www.youtube.com/watch?v=Wfa-t0eHUl0
[By Weight PLU]
1. Recall a By Weight PLU.
2. Press the [OVERRIDE] key. (If prompted, enter the password.)
3. Enter the new Unit Price. Place commodity on the platter.
4. Press the [PRINT] key.
[Non Weight PLU]
1. Recall a Non-Weight PLU.
2. Press the [OVERRIDE] key. (If prompted, enter the password)
3. Enter the new Unit Price then press the [PRINT] key. If you want to change the quantity, too, then press the [FOR] key.
4. Enter the Quantity and press the [PRINT] key.
[By Count PLU]
1. Recall a By Count PLU.
2. Press the [OVERRIDE] key. (If prompted, enter the password)
3. Enter the new Unit Price and press the [FOR] key.
4. Enter the Quantity that is being purchased then press the [FOR] key.
5. Enter the Quantity the item is priced by and press the [PRINT] key.
Please watch the video: https://www.youtube.com/watch?v=1-h_ZU6I5ZQ
[TARE Override]
1. To override a Tare Weight already programmed in a PLU, recall the PLU.
2. Place the container on the platter and press the TARE key.
3. Place commodity on the tray and press PRINT key.
[Manual TARE and Weighed TARE for MISC Item]
1. To enter a Tare weight manually, make sure there are no PLU’s recalled (scale is at all zeroes).
2. Enter the weight using the number keys and then press the TARE key.
3. Press the MISC WEIGHT key and enter the unit price.
4. Place commodity on the tray and press PRINT key.
5. To enter the Tare weight of a container, make sure there are no PLU’s recalled (scale is at all zeroes).
6. Place the container on the tray and press the TARE key.
7. Press the MISC WEIGHT key and enter the unit price.
8. Place commodity on the tray and press PRINT key.
[Printing Multiple Labels]
1. Recall the desired PLU and press the PRESET COUNT key.
2. Enter the desired number of labels to print and press the PRINT key.
3. Labels will be issued.
[PLU Type Change : By weight to By Count]
1. Recall the desired By Weight PLU and press the FOR key.
2. The PLU is now a By Count PLU. If you want, you can change the quantity or/and the unit price by pressing the FOR key.
3. Enter the quantity for purchase and press the FOR key.
4. Enter the quantity the item is priced by and press the FOR key.
5. Enter the unit price and press the PRINT key.
Please watch the video about print all PLU data: https://www.youtube.com/watch?v=LThSLuUoHqU
1. Press the [MODE] – [PRINT] key.
2. You will see “Min PLUNO Value” on the INFORMATION display.
3. If you want to print label for PLU#1 to PLU#10, then Press “1” – [PRINT] key.
4. Press “10” – [PRINT] key.
5. Press the [SAVE] key.
6. DLP-300 will print the labels from PLU#1 to PLU#10.
Please watch the video: https://www.youtube.com/watch?v=DpP5Sgyw-P4
Set up the scale.
1. Plug a RJ45 cable(:Ethernet cable) from the scale to the router.
2. Press and hold the [ZERO] key and press “1”+”1”+”2”
3. Press the [PRINT] key, press “1” and press [PRINT] key. This number is the scale number.
4, Press the [X] key. You will see “H03”on the TARE display and “Ethernet IP” on the Information display.
5. Press the [PRINT] key then press “192”+”168”+”1”+”51” then [PRINT].
(This is the number you want to set as your scale IP address)
6. You will see “H04” on the TARE display. Press the [PRINT] key 5 times to confirm that the number is correct. (255.255.255.0)
7. You will see “H05” on the TARE display. Press the [PRINT] key 5 times to confirm that the number is correct. (192.168.1.1)
8. You will see “H06” on the TARE display. Press the [PRINT] key 5 times to confirm that the number is correct. (192.168.1.1)
9. Press the [SAVE] key.
10. If you have more scales, please follow the same steps above.
Remember, the scale IP address (#4) should not be same for each scale.
Connecting the DLP-300 scale with XDB manager software
1. Plug a RJ45 cable(:Ethernet cable) from the PC to the router
2. Set up or find your PC IP address. Go to Network – Change adapter options.
And go to properties. Click TCP/IPv4 – Properties. Then you can change or see your PC IP address. (Ours is 192.168.1.50)
3. Open the XDB Manager software.
4. In the section [Dept-Mg-Scale], right click and select [Add DEPT].
5. Fill out the Dept No. and Dept name. And press [Save] then [Close].
6. Right click on the Department. And select [Add MainGroup].
7. Fill out [MG NO.] and [MainGroup Name]. Select the Department. And press [Save] then [Close].
8. Click the Department "DB MART" and right click on "MEAT" and select [Add Scale].
9. Fill out the [ScaleNo] and the [IP Address] for the scale IP address.
We put NO.1 and “192.168.1.51” for the scale IP address. And press [Save] then [Close].
10. Click the Department "DB MART" and right click on "MEAT" and select [Add Scale].
11. Fill out the [ScaleNo] and the [IP Address] for the scale IP address.
We put NO.2 and “192.168.1.52” for the scale IP address. And press [Save] then [Close].
12. Go to the XDB Manager. Click “TCP/IP” on the top menu bar and click “NetworkDetect”.
Then under “Scale List”, select all scales that you want to check the connection. Then click [OK].
Once you see the 100% green bar for “Network Test” in the Progress Bar on the right, then your DLP-300 scale is connected correctly to your PC.
13. Search “CMD”(or “Command Prompt”) on your PC to run Command Prompt. Enter “ping 192.168.1.51” And press ENTER.
If you get a reply, then your DLP-300 scale is connected correctly to your PC.
If you want to check another scale, then repeat step #13.
14. You just finished adding a scale to the XDB manager software.
Now, I will show you how to add a PLU to the XDB manager.
Enter the PLU #, Item Code, Name, Unit Price, and press the [SAVE] key. You can add some Ingredients as well.
15. Let’s try to download PLU data for testing. Click “TCP/IP” on the top menu bar of the XDB manager.
16. Click “Download All PLU” and click the scale #. Then click [OK].
17. Once you see the 100% green bar in the Progress Bar on the right, the PLU data has properly downloaded.
You will be able to recall PLU data from your scale.
Please watch the video about "Check Min Wt.": https://www.youtube.com/watch?v=x66jqz_vVoE
1. Press and Hold [ZERO] key and same time press "1"-"0"-"1"-"3"
2. Press and Hold [ZERO] key and same time press "1"-"4"-"2"
3. You will see "SP501" on WT display.
4. Press "5"-"1"-"2" and press [X] key.
5. You will see "Min d Printing W" on information display.
6. Press "1" and press [PRINT] key.
7. Press [SAVE] key.
8. Press [C] key.
Please watch the video: https://www.youtube.com/watch?v=ZNfmqRp5LYU
1. Connect the USB drive to the scale ①. The USB drive should be formatted to be a FAT type, not NTFS type.
2. You will see the [▼] over the [USB] on the display.
3. Press the [MODE] key three times and press the [OVERRIDE] key four times.
4. You will see “Z13” “Backup” on the display and press the [PRINT] key.
5. Press “1” and the [PRINT] key to download all settings.
6. Press “1” and the [PRINT] key to download the Network setting.
7. Press “1” and the [PRINT] key to download all Label Format.
8. Press “1” and the [PRINT] key to download UDF BCD Format(User Defined Barcode Format).
9. Press “1” and the [PRINT] key to download the Main db(database).
10. Press [SAVE] to Back up.
11. Connect the USB drive to the scale ②.
12. Press the [MODE] key three times and press [OVERRIDE] key three times.
13. You will see “Restore” on display and press the [PRINT] key.
14. Press “1” and the [PRINT] key to restore all settings.
15. Press “1” and the [PRINT] key to restore the Network setting.
16. Press “1” and the [PRINT] key to restore all Label Formats.
17. Press “1” and the [PRINT] key to restore the UDF BCD Format(User Defined Barcode Format).
18. Press “1” and the [PRINT] key to restore the Main db(database).
19. Press [SAVE] to restore and press the [FEED] key.
20. Now you can see that the data has been copied.
(PLU, Network setting and so)
If you want to copy only PLU data,
1. Press the [MODE] key three times and press the [OVERRIDE] key two times.
2. You will see “Z15” “Save PLU to USB” on the display and then press the [PRINT] key.
3. Press “1” and press the [SAVE] key.
4. Connect the USB drive to the scale ②.
5. Press the [MODE] key three times and press the [OVERRIDE] key.
6. You will see “Z16” “Load PLU from USB” on the display.
7. Press “1” and press the [SAVE] key.
8. Now you can see all PLU data on the scale ②.
Please watch the video: https://www.youtube.com/watch?v=aJ4908wDIW4
If you don’t want to print “PACKED ON DATE / SELL BY DATE” on the label, please follow these instructions.
First, use the shortcuts key for all PLUs.
1. Press the shortcut key # ①. The “PACKED ON DATE” will be printed on the label.
2. Press the shortcut key # ②. The “SELL BY DATE” will be printed on the label.
3. If press the key # ① again, the “PACKED ON DATE” will not be printed on the label.
4. If press the key # ② again, the “SELL BY DATE” will not be printed on the label.
5. These shortcuts are only possible if the scale version is greater than V1.0.3.0. To check the version of your scale, press “1” - “4” - “5”.
Secondly, change the setting by PLU.
1. If you want to print the “PACKED ON DATE” and the “SELL BY DATE” of PLU #1, press the [MODE] key twice.
2. Press [PRINT] - “1 (;PLU#)” and then press the [PRINT] key again.
3. Press the [PRINT] key 7 times to find “Print Pack Date” and “Prt Sell By Date” and then press “1” for printing or “0” for not printing. Then press the [PRINT] - [SAVE] key.
4. If you can’t see “Print Pack Date” and “Prt Sell By Date” while pressing the [PRINT] key,
press the [FEED/ESC] key and then press the [OVERRIDE] key. You will see “PLU Fields Visibility” on the display.
5. Press the [PRINT] key, press the [OVERRIDE] key 6 times. You will see “Print Pack Date” on the display.
6. Press “1” for printing or “0” for not printing. And then press the [PRINT] key.
7. Press the [OVERRIDE] key 4 times. You will see “Prt Sell By Date” on the display.
8. Press “1” for printing or “0” for not printing. And then press the [PRINT]
9. Press the [SAVE] - [FEED/ESC] key.
Please watch the video: https://www.youtube.com/watch?time_continue=4&v=cgx0MuuxcN8&feature=emb_title
1. Go to www.Visiontechshop.com and find DLP-300 scale from the BEST Selling models.
2. Scroll down and Click the Download tab under product image.
3. Click “Template DLP-300 PLU CSV File“ to download the template of PLU data.
4. Open Template DLP-300 PLU CSV File.CSV.
5. Enter your PLU data.
6. Item code is for barcode on the label. You must enter the item code. Otherwise, the barcode will not be printed on the label.
7. If you want to print “SELL BY DATE” on the label, please enter “1” on “Print Sell By Date” column. If NOT, enter “0”.
8. If you want to print “PACKED DATE” on the label, please enter “1” on “Print Pack Date” column. If NOT, enter “0”.
9. [Important!] You must save the file as “CSV” file, not “XLS” file.
10. Open the XDB Manager program.
11. Click [PLU] and Click [PLUImportConfig] on the top.
12. Click “Open” and change the file type to “CSV Text File(*.CSV)”. Select and open “Template DLP-300 PLU CSV File.csv”.
13. Match the Import Field and Index with CSV File.
14. Main Group No is 1st column. So, click “Enable” on MainGrpNo and enter “0” on “Index”
15. PLU No is 2nd column. So, click “Enable” on PLUNO and enter “1” on “Index”
16. PLU Name is 3rd column. So, click “Enable” on Name and enter “2” on “Index”
17. PLU type is 4th column. So, click “Enable” on PLU Type and enter “3” on “Index”
18. Do same way with other field. If CSV file doesn’t have the information, then uncheck “Enable” and enter “-1” on “Index”.
19. Click [Apply] and [Save].
20. Click [Import PLU] and click “Yes”.
21. After import all PLU data, click “OK”.
Please watch the video: https://www.youtube.com/watch?v=0XzkTbA5saY
Use to the XDB Manager.
1. Open the XDB manager.
2. You will check the PLU Item Code. It must be blank.
Then, enter the Item Code.
3. Click the [SAVE] key.
4. Click the “TCP/IP” and “Download All PLU” and click the scale #. Then click [OK]
5. Now you can see the barcode.
Use to the Scale.
1. Press the [MODE] key twice.
2. Press the [PRINT] key and press “1” ( PLU number )
3. Press the [PRINT] key 4 times. You will see “ItemCode” on the display.
4. Press “1” and press the [PRINT] key.
5. Press the [SAVE] key and press the [FEED] key.
6. Now you can see the barcode.
Please watch the video: https://www.youtube.com/watch?v=dPeyQze59gg
1. If you want to recall PLU #1.
2. Place a commodity on the platter.
3. Press “1” and press [PLU] key. Press the [PRINT] key.
[Recalling a PLU using the speed key]
1. Press the [MODE] key twice.
2. Press the [X] key 5 times. You will see the “PLUKEY File” on the display.
3. Press the [PRINT] key.
4. If you want to assign PLU #1 to Speed key #1, press “1” and press the [PRINT] key.
5. If you want to assign PLU #2 to Speed key #2, press “2” and press the [PRINT] key.
6. Press the [SAVE] key and press the [FEED] key.
7. Press “1” on PLU keypad to recall PLU #1.
8. Press “2” on PLU keypad to recall PLU #2.
[How to assign the speed key by automatically]
1. Press the [MODE] key twice.
2. Press the [X] key 4 times. You will see the “Auto. Dist. PLU” on the display.
3. Press the [PRNIT] key.
4. Press the [SAVE] key. And press the [FEED] key.
5. As you see, all PLUs are set up on each Speed key.
[Using MICS WEIGTH / MISC NON WEIGTH / MISC BY COUNT]
*MICS WEIGTH*
1. Place a commodity on the platter.
2. Press the [MISC WEIGHT] key. And press “1” “9” “9”. (Price)
3. Press the [PRINT] key.
*MISC NON WEIGTH*
1. Press the [MISC NON WEIGHT] key.
2. Press "2" for the quantity. And press the [FOR] key.
3. Press the “3” “0” “0”(price) and press the [PRINT] key.
*MISC BY COUNT*
1. Press the [MISC BY COUNT] key. And press “2” for the Quantity that is being purchased and press the [FOR] key.
2. Press “3” for the Quantity the item is priced by and press the [FOR] key.
3. Press the “5” “0” “0”(price) the new Unit Price. And press the [PRINT]
Please watch the video: https://www.youtube.com/watch?v=DursvV2cYFc
1. First, flip the scale and you will find the CAL switch cover on the bottom back side. Remove the CAL switch cover.
2. Turn on the scale and you will hear a BEEP sound.
Once you see “Booting....” on the information display, press and hold the CAL switch until you hear a short BEEP sound.
3. Press and hold the [BLUE ZERO] key and Press “9” + “8” + “1” + “1”. then you will see the “60.00” on the display.
4. Press the [PRINT] key twice. You will see “SP” and “60.00” on the Total Price display.
5. Load a 60 lb weight then press the [PRINT] key.
6. The Weight Display should read “60.00”. Remove the weight to make sure the weight goes down to 0.00.
7. Then place the weight back on to confirm that the scale is reading the weight properly.
Please watch the video: https://www.youtube.com/watch?v=SdaHw3uWR0I
Please watch the video: https://www.youtube.com/watch?v=1QAUMlcEO_0
Please watch the video: https://www.youtube.com/watch?v=uM5k4otymCA
How to create a New PLU code. (2nd Edition)
1. Press [MODE] key twice and [PRINT] key one time.
2. Enter the PLU number you wish to create and press the [PRINT] key.
3. Enter the PLU name (ex: apple) and press [PRINT] key.
4. Enter the unit price (ex: 2.99) and press the [PRINT] key.
5. Enter the PLU Type
*No.0 (Weight) / No.1 (Non-Weight) / No.3 (By count)
6. Enter the Item code and press [PRINT] key.
7. Enter the sell by date and press [PRINT] key.
8. Enter the Tare weight(if you want) and press [PRINT] key.
If you want put 0.03 LB as the Tare weight, press 3 - [PRINT] key.
9. If it is by Count PLU, enter the Quantity and press [PRINT] key.
Otherwise, just press 1 - [PRINT] key.
10. Enter the ingredient message (ex: red) and press [PRINT] key.
**Number 0 means not to print / Number 1 means to print
11. If you want to print the SELL BY DATE, press 1 and the [PRINT] key.
If not, press 0 and the [PRINT] key.
12. If you want to print the PACK ON DATE, press 1 and the [PRINT] key.
If not, press 0 and the [PRINT] key.
13. Press the [SAVE] key.
Please watch the video: https://www.youtube.com/watch?v=_K-t3bdlmPo
Please watch the video: https://www.youtube.com/watch?v=AgXhG_KdmyM
Please watch the video: https://www.youtube.com/watch?v=PV1fHs3mGQE
Please watch the video: https://www.youtube.com/watch?v=ztWzeF6oYhA
Please watch the video: https://www.youtube.com/watch?v=C5ptafS-3VM
Please watch the video: https://www.youtube.com/watch?v=MzT037FBVsc
Please watch the video: https://www.youtube.com/watch?v=q1wAkzbVU1c
Please watch the video: https://www.youtube.com/watch?v=kMUceJmFUfg
Please watch the video: https://youtu.be/IWtA9PGRuIY
Please watch the video: https://youtu.be/qpwAj62J4Vk
Please watch the video: https://www.youtube.com/watch?v=Fmq_JHQnTCI&t=38s
Please watch the video: https://www.youtube.com/watch?v=bzSGZd8qV9M
Please watch the video: https://www.youtube.com/watch?v=wMhZc1VLNDI
Please watch the video about HK-7200. https://www.youtube.com/watch?v=H-_1ecF8XuY
How to reset the E.J
1. First turn on the HK-7200
2. Turn the key to the [Z] mode.
3. Press “2” to (RESET E.J) and then press the [CASH] key.
4. If you see the “ARE YOU SURE?” message, you can press the [CASH] key.
5. Now your E.J is reset.
6. Turn your key back to register mode
How to lose the function of E.J
1. Turn the key to [P] made.
2. Press “4” for (OPTIONS) and then press the [CASH] key.
3. Press “10”(E.J] and then press the [CASH] key.
4. You can see a [Y] next to the “E.JOURNAL ENABLE” and then press the [CASH] key.
5. Press [No] to change the [Y] to a [N]
6. Then press the [CLEAR] key 3 times
7. Then turn the key back into register mode
For the 60 key the yes or no button is the F/S tend and Check button so the F/S is the up arrow
or the yes button and the Check is the down arrow or the no button
This is the same for the 90 key as well.
Please watch the video. https://www.youtube.com/watch?v=bF9CzPqb8sc&t=3s
Please watch the video: https://www.youtube.com/watch?v=Cwiv-uJA83I
Please watch the video: https://www.youtube.com/watch?v=GQ1KPOmUfDs
Please watch the video: https://www.youtube.com/watch?v=1RVJYO82leM
Please watch the video: https://www.youtube.com/watch?v=t_qJRdz0pqQ
Please watch the video: https://youtu.be/5Sq2KArrsxI
Please watch the video: https://youtu.be/lDNB_wQWUpw
Please watch the video: https://www.youtube.com/watch?v=AqSHRtHbRkYqSHRtHbRkY
Please watch the video: https://youtu.be/2RqKdBpF5vA
Please watch the video: https://www.youtube.com/watch?v=Zz22-iUUf4o
Please watch the video: https://www.youtube.com/watch?v=DmGEBVjEDHU
Please watch the video: https://www.youtube.com/watch?v=kkYmlMo_lak
Please watch the video: https://www.youtube.com/watch?v=9HZGAc6sUaE
Please watch the video: https://youtu.be/ch6f6uRI9Yg
Please watch the video: https://www.youtube.com/watch?v=XNj1mJob7f8
Please watch the video: https://www.youtube.com/watch?v=gu--B8t_PbM
Please watch the video: https://www.youtube.com/watch?v=AfuYF7QHd78
Please watch the video: https://www.youtube.com/watch?v=-9hedFsdpDk
Please watch the video: https://youtu.be/WagyNUEqxME
Please watch the video: https://youtu.be/e2WkY8jHYc0
Please watch the video: https://youtu.be/c38PlKmCoUA
Please watch the video: https://youtu.be/rn1WAyeLYlw
Please watch the video: https://youtu.be/YPLnYd0paFc
Please watch the video: https://www.youtube.com/watch?v=gu--B8t_PbM
Please watch the video: https://www.youtube.com/watch?v=l5PtJqdkrv4
Please watch the video: https://youtu.be/5BWhUsXI4OI?si=WNps-FEdudsrzGIQ
Please watch the video: https://www.youtube.com/watch?v=G68pC2wsODk
Please watch the video: https://www.youtube.com/watch?v=tGpZdjQFP5E
Please watch the video: https://www.youtube.com/watch?v=gu--B8t_PbM
Please watch the video: https://www.youtube.com/watch?v=aXtLaStR87s
Please watch the video: https://www.youtube.com/watch?v=eQk-yM2H09U&feature=emb_title
Please watch the video: https://www.youtube.com/watch?v=2KCQkNi-efE&feature=emb_title
Please watch the video: https://www.youtube.com/watch?v=NXtA8fqbSLA&feature=emb_title
Please watch the video: https://www.youtube.com/watch?v=imrk4or4MXw&feature=emb_title
Please watch the video: https://www.youtube.com/watch?v=QRC6rUJX5Hw&t=8s
You will get a package from us.
When you open the box, there are one TVP scale, one DLP-50 printer and one box of LST8060(12rolls).
Open the TVP scale box.
Connect the ADAPTOR(12V/500mA) under the TVP scale.
And then plug the adapter to the wall. You will see a red light in the front of scale.
Turn on the scale. The switch is located in the right front side of the bottom of the scale.
Let's open the DLP-50 printer box.
Connect the ADAPTOR(12V/2.5A) to the DLP50 printer.
Connect the interface cable between DLP-50 printer and TVP scale.
Plug the power adapter to the printer. Turn on the printer. You will see a green light.
For testing, press "LF" key on the front of printer. If the label comes out, the printer is working properly.
Put an item on the scale first. And press 123 for the unit price($1.23).
Press the "M+" key. You will see a label with sales information from the printer.
Let's do it again.
Take out the item from the scale.
Press 145 for the unit price($1.45). And put an item on the scale.
Press the "M+" key. You will get a label from the printer.
Please remember. If the total price is 0.00, you can't get any label from the printer, even if you press the "M+" key.
If you want to print a label, the total price must be over 0.00.
Please watch the video: https://www.youtube.com/watch?v=YmCZxrXRLOc
Please watch the video: https://www.youtube.com/watch?v=iKB9QkC6BO4
1. First, flip the scale and you will find a bolt on the bottom back side. Remove the bolt.
2. Press and hold the [TARE] key at the same time and turn on the scale. The ON/OFF switch is the bottom right side of scale.
3. You will see Pn on the display. Press “0” 4 times.
4. Press the [TARE] key twice. Then you will see “F0” , “CAL” on the display.
5. Press the CAL switch on the bottom of the scale and press the [TARE] key. Then you will see the “UNLOAD” on the display.
6. Press the [TARE] key. You will see “CAP” , “LOAD” and Full capacity(12.000) on the display.
7. Load the full capacity (12lb) of weight on the scale. Then press the [TARE] key.
8. Remove the weight and press the RED [ZERO] key.
Please watch the video: https://www.youtube.com/watch?v=gu--B8t_PbM
Please watch the video: https://www.youtube.com/watch?v=hFKrbdGyDDA
Please watch the video: https://www.youtube.com/watch?v=T8R00qW86L8
1. First, turn on the scale. Press and hold “TARE” key and press “ON/OFF” key during self-check until display shows “F1 CAL”.
2. Then press the calibration switch, which is located below the battery with a sharp material.
3. Press “ZERO” to confirm and display will show LB
4. Press “ZERO” to confirm and display will show “unload”
5. Press “ZERO” again and select the max calibration weight value by pressing “TARE” to select the
weight value. (2lb, 4lb, or 6lb).
6. Place the weight on the platform.
When the stable indicator is on, press “ZERO“ key to confirm and “PASS” message will be shown on display.
7. Scale will restart.
8. In case display shows any error message or incorrect measurement, repeat the calibration steps
stated above again.
Please watch the video: https://www.youtube.com/watch?v=M3t__2PV1Rk
Please watch the video: https://www.youtube.com/watch?v=xWOxha9hli0
Please watch the video: https://youtu.be/Hd5eRsKZBXc
Please watch the video: https://youtu.be/b2ZS_Dq2zao
Please watch the video: https://youtu.be/V3rl6af6AzM
Please watch the video: https://www.youtube.com/watch?v=7MR29RMwVco
1. Touch the “ON/RATIO” key placed on the left side to turn it on as a coffee scale.
2. The default coffee and water ratio is 1:16. If you want to change this ratio, touch the “ON/RATIO” key.
It will be changed from 1:16 è 1:18 è 1:20 every time it is touched.
3. Place the pot and filter on the scale. Press the “TARE” key.
4. Add coffee in the filter and press the “Water” key.
You can see the amount of coffee beans placed(23.4gram), the ratio between the coffee and water(1:16),
and amount of water you need to add (374.5ml).
5. Add the required amount of water. The timer will start. Every 30 seconds, you will hear a beep sound.
If water is close to the target water amount, you will hear 3 beeps. When water hits the target amount, you will hear long beep sound. Once you hear this, stop pouring water. To stop the long beep sound, press the “Water” key.
6. If you want to make new coffee, press and hold the “ON/RATIO” key. Everything will reset.
7. This scale also allows you to have your own desired ratio. To do this, first turn off the scale.
Press and hold the left side “ON/RATIO” key. You will see “1:20” with “20” blinking.
With the UP arrow ( ↑ ) key or the DOWN arrow ( ↓ ) key, set your own coffee ratio.
Press the “ON/RATIO” key to confirm. Touch the “ON/RATIO” key to turn on the scale.
Press the “ON/RATIO” key and select your own ratio.
Please watch the video: https://www.youtube.com/watch?v=cs7qgvo7PYM
Please watch the video: https://www.youtube.com/watch?v=XNj1mJob7f8
Please watch the video: https://www.youtube.com/watch?v=gu--B8t_PbM
National Type Evaluation Program. Please visit The National Conference on Weights and Measures at www.ncwm.net.
The certificates of each model are available for download on each product page.
Our main office located in Hackensack, NJ 07601 is open from 8:30 AM to 5:15 PM Eastern Time, Monday to Friday.
Address: 100 Temple Ave, Hackensack, NJ 07601
Phone: +1 201.970.8897 / +1 201.970.8894
Email: gousapos@gmail.com / contact@visiontechshop.com
Please watch the video: https://www.youtube.com/watch?v=dNfNhcwN9hI
Please watch the video: https://youtu.be/Px8hB7PVHk4
Please watch the video: https://www.youtube.com/watch?v=tBWra-3Ov2U
Please watch the video: https://www.youtube.com/watch?v=nxBj0P1IIfg
Please watch the video: https://www.youtube.com/watch?v=lEwnZXdWErU
Please watch the video: https://www.youtube.com/watch?v=gJ5dSonpsy8
All products that are covered under the original warranty period will be repaired free of charge in the case of defects in material and/or workmanship.
Warranty repairs must be initiated through VisionTechShop.com/HK SYSTEMS.
Please check the warranty by model, please click the following link: https://visiontechshop.com/pages/repair-warranty
All owner's manual are available for download on each product page.
VisionTechShop.com / HK SYSTEMS
100 Temple Ave
Hackensack, NJ 07601
Phone: +1 201.970.8897 / +1 201.970.8894
Email: gousapos@gmail.com / contact@visiontechshop.com
Please send us an email to gousapos@gmail.com or contact@visiontechshop.com.
Please send us an email to gousapos@gmail.com / contact@visiontechshop.com.
1. "Return shipping cost" from customer to us must be paid by customer.
2. "Repair shipping cost" from the customer/dealer to us must be paid by the customer/dealer.
VisionTechShop.com/HK SYSTEMS will pay the shipping cost from us to the customer/dealer after repair.
3. More details of return and repair, please click the following page : "REPAIR / WARRANTY" https://visiontechshop.com/pages/repair-warranty